Webopac Preferences – Search tree
1. Introduction
Search trees offer a structured approach to searching the database. Each subject is subdivided into elements. You can define many search trees, and create links between several trees.
Components of the tree are:
· presentation: you can create heading texts
· hypertext links to a URL or a file (picture, text, etc.)
· link to a tree or to another page of a tree
· link to an index
· link to savelists (AFO 141 savelists to the web)
· link to a database to search the catalogue.
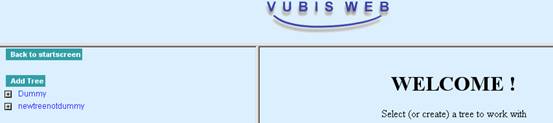
When you select the option you are presented with a list of previously defined search trees. You can use any of these to attach to individual profiles.
2. Setup
· Click the button under the All Profiles section on the Start page.
The Search tree screen is displayed:
2.1 Create a new tree
· To add a new search tree, click the button.
The New Tree window is displayed:

· Enter a name for the tree in the Tree identification text box. The name can be alphanumeric. It must contain no blanks.
· If you wish, add the name of an icon in the Default image text box. This icon is added to the display of all the elements and all the pages. Icons can be of the file type .gif, .bmp. .jpg.
· Enter the directory where the icons for the Web OPAC are filed in the Default directory text box. E.g. Images
· Enter the size for the icon (in pixels). E.g. 24
· Click either Left, Middle or Right for the standard alignment
· Click one of the options for position of the icon within the text.
· Select how many columns from the drop-down menu
· Then select how the columns display, as columns then lines, or lines then columns.
Example:
9 elements in 3 columns
|
1 |
2 |
3 |
|
4 |
5 |
6 |
|
7 |
8 |
9 |
Or:
|
1 |
4 |
7 |
|
2 |
5 |
8 |
|
3 |
6 |
9 |
The sign
![]() appears when there is no standard icon it is linked to.
appears when there is no standard icon it is linked to.
· Click the button
· Press the F5 key to refresh the screen.
Your new search tree is displayed in the list of search trees.
2.2 Add a new page
To add a new page to a search tree:
·
Click the ![]() sign next to the name of the new tree
sign next to the name of the new tree
· Click the button
The New Page window is displayed:

· Enter a name for the new page
· Click the button
The next screen allows you to define the properties for the page:

· Enter the number of columns. The standard value is the default but you can modify the value for each page.
· Select how many columns from the drop-down menu
· Then select how the columns display, as columns then lines, or lines then columns.
· Click either Left, Middle or Right for the alignment
· Enter the size for the icon (in pixels). E.g. 24
· Choose the image position
· Enter the required title as it should appear above the page.
· Elements have their own wording. Use the arrows to determine the placing of the elements.
· You can add an empty line.
· Click the button.
On the left side of the screen you now have your added page.
2.3 Add a new element
To add a new element to a search tree:
· Click on the Add element button
The New element screen is displayed:
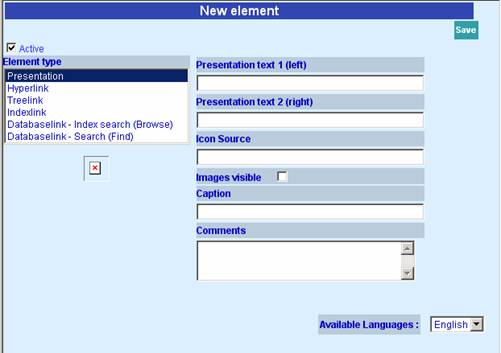
· Choose the correct element type.
The Active check box should be ticked. If you wish, you can deactivate this option. The element is not used but remains to be available in the rest of the system.
Location icon describes the name of the file of the icon (jpg, gif, bmp, …) with the access path. If you do not specify a name, the system takes the default defined in the property of the tree (above).
· To make the icon visible, tick the Images visible checkbox.
· You can define the text that appears when the mouse is placed on the icon
· Enter wording in the Comment text box. This is for staff use and does not appear in the Web OPAC.
· Click the button.
On the left side of the screen you now have your added element.
3. Importing search trees
3.1 Introduction and overview of procedures
This section describes how search trees can be imported from a file. This feature allows you to define a search tree using e.g. Microsoft Excel. The procedure one has to follow is:
1. Define the search tree in Excel, using the guidelines in this section.
2. Save the document as Text (Tab delimited) (.txt)
3. Import the tree from within the WebOpac Preferences.
The feature also allows you to import a new version of an existing tree. Note that this is a full regeneration of the tree: the old version is deleted and the new one imported. You can re-import a tree as often as you want to.
The next paragraphs describe the following steps:
· How to create the source document
· Saving the source document to a Tab delimited text file
· Importing the tree from within the WebOpac Preferences
· Description of the source document
3.2 How to create the source document
The source document is a regular Excel document that contains all page id's and the (search) properties of each element on a page.
Please follow these guidelines:
· All information should be stored on a single sheet. If you decide to maintain multiple sheets within the workbook, you must copy all information to a single sheet before you save the sheet as Tab delimited text (please see below).
· Do not use rows 1 and 2 of the spreadsheet. These are used to store header information.
· Page id's must be surrounded by square brackets. We advise you to put page id's in uppercase; this is not necessary, but adds clarity to the spreadsheet.
· Page id's are stored in column 1 and have no additional properties.
· Information related to a single page may be followed by a blank row, but this is not necessary. The blank row is only added to add clarity to the spreadsheet.
· Cell 1 of the last row must contain the string <ENDOFFILE>.
A number of tree properties cannot be imported, but are set automatically at the time of import. See section 3.6 for a complete description of all properties that can be imported.
3.3 Saving the source document to a Tab delimited text file
The source document must be saved to a Tab delimited text file before it can be imported through the WebOpac Preferences.
Before you save the document, make sure that it end with <ENDOFFILE> (this must be the content of the first cell on the last row).
Save the document as follows:
1. Select the Save As… option from the Excel File menu.
2. The system will offer you the ability to define a file name and a file type. Select the option “Text (Tab delimited) (*.txt)” from the option list.
3.4 Importing the tree from within the WebOpac Preferences
On the Search Tree page in Preferences, there is a button “Import Kids Tree”, which can be used to import the Tab delimited file. If you click the button, you get a form in the right frame:
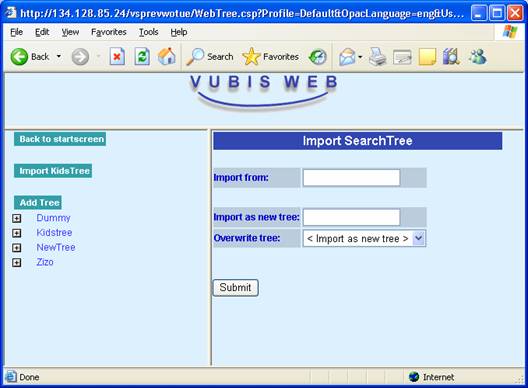
Fields on the screen
Import from. Give the name and the full path of the file. The file must be on the database server or on a server that can be ‘seen' by the database server.
Import as new tree. If you want to import the file as a new tree, fill in the name of the tree. If you want to overwrite an existing tree, leave this field empty.
Overwrite tree. If you want to overwrite an existing tree, select the tree that you want to overwrite. If you want to import the tree as a new tree, keep the default setting “<Import as new tree>”.
After all fields are filled in, click the button. The tree will be imported.
3.5 Making links clickable
After importing a search tree, some links may not fucntion. This can be rectified by using “save changes” for this element in Preferences – Search tree – element. This has a certain cause (see explanation below) but can be rectified.
When preparing a link in a search tree it is checked which search method can be used to perform the search. Usually a row of tabs is shown above a search result, with index(es) used, delimiters etc. But these delimiters must exist, otherwise the user will see a result that does not correspond with what is at the top of the page. In other words, when you click ‘Search' on such a page you should ideally get the same result. If that is not possible, no url will be generated and therefor the query is not clickable.
So why does the query become clickable when you use “save changes”? Say the query contained a delimiter on a material type that does not exist. That is the reason the query is not clickable. In the presentation of the query in the Preferences this option was not available and thus not selected. When saving the query, the delimiter is stripped which makes the query clickable.
There are cases where you would want to perform a query that would not be possible with one of the regular search methods. In that case you must specify in the Preferences at the bottom of the page with the details of an element, under “Show search tabs above search results” that you do not want to show tabs. In that case the query is always clickable.
3.6 Description of the source document
The following table contains a description of all properties that can be imported.
|
Column Id |
Property |
Comments |
|
A |
Title Dutch |
Caption of the element in Dutch. If the caption is a Page Id, it should be surrounded by square brackets. |
|
B |
Title English |
Caption of the element in English. |
|
C |
Title French |
Caption of the element in French. |
|
D |
Type |
Element type. The following values are valid: Text = no link element (only display of text or picture) – only columns E and AX must be defined (can be defined) Hyperlink = url – only column E and AY must be defined (can be defined) IndexLink = a link to a 'SaveList to the web' – only columns E and AZ must be defined (can be defined) DatabaseLink = any valid search request – columns E and G to AW must be defined (can be defined) TreeLink = link to a page in a tree – only column F must be defined (can be defined) |
|
E |
Image |
Id of the related image Usually this has the format of .gif or .jpg |
|
F |
Id of treelink |
Id of the Page Id in the tree This must be a Page Id in the current tree structure |
|
G |
Database |
Database id (e.g. 2) |
|
H |
Partial index |
Partial index id |
|
I |
Search method |
FIND or BROWSE (in uppercase) |
|
J |
Restriction Language |
One or more language id's, separated by comma's e.g. dut,eng |
|
K |
Restriction Publication Date (begin) |
Publication begin date e.g. 1990 |
|
L |
Restriction Publication Date (end) |
Publication end date e.g. 1990 |
|
M |
Restriction Location |
One or more location id's, separated by comma's e.g. BB/CEN,BB/XYZ |
|
N |
Restriction Material Type |
One or more material type id's, separated by comma's e.g. JSP,JVR,TTB |
|
O |
Restriction Creation Date |
|
|
P |
Restriction Pages |
|
|
Q |
Restriction Document Type |
|
|
R |
Restriction Sublocation |
One or more sublocation id's, separated by comma's e.g. AAC,DFE,QR |
|
S |
Restriction Price |
|
|
T |
Search string |
Search string The search string can contain truncation (*) or masking ($) characters. |
|
U |
Index |
Index id (as defined through AFO 151) |
|
V |
Boolean 2 |
AND or OR or NOT |
|
W |
Search string 2 |
Search string |
|
X |
Index 2 |
Index id (as defined through AFO 151) |
|
Y |
Boolean 3 |
AND or OR or NOT |
|
Z |
Search string 3 |
Search string |
|
AA |
Index 3 |
Index id (as defined through AFO 151) |
|
AB |
Boolean 4 |
AND or OR or NOT |
|
AC |
Search string 4 |
Search string |
|
AD |
Index 4 |
Index id (as defined through AFO 151) |
|
AE |
Boolean 5 |
AND or OR or NOT |
|
AF |
Search string 5 |
Search string |
|
AG |
Index 5 |
Index id (as defined through AFO 151) |
|
AH |
Boolean 6 |
AND or OR or NOT |
|
AI |
Search string 6 |
Search string |
|
AJ |
Index 6 |
Index id (as defined through AFO 151) |
|
AK |
Boolean 7 |
AND or OR or NOT |
|
AL |
Search string 7 |
Search string |
|
AM |
Index 7 |
Index id (as defined through AFO 151) |
|
AN |
Boolean 8 |
AND or OR or NOT |
|
AO |
Search string 8 |
Search string |
|
AP |
Index 8 |
Index id (as defined through AFO 151) |
|
AQ |
Boolean 9 |
AND or OR or NOT |
|
AR |
Search string 9 |
Search string |
|
AS |
Index 9 |
Index id (as defined through AFO 151) |
|
AT |
Boolean 10 |
AND or OR or NOT |
|
AU |
Search string 10 |
Search string |
|
AV |
Index 10 |
Index id (as defined through AFO 151) |
|
AX |
Text |
Only defined if Type = Text |
|
AY |
URL |
Only defined if Type = Hyperlink |
|
AZ |
Savelist id |
Only defined if Type = Savelist |